Pink Fire Pointer Merry Christmas
Showing posts with label 4.25 x 5.5 cards. Show all posts

Class Kits Available!


My Sparkle and Shine 5 Christmas Cards class was held yesterday.


It was a great time, so sorry you missed it!  ;)


I served hot chocolate with whipped cream, and I even made some Impossible Pumpkin Pie Cupcakes for my guests.


Super yum!


♥


Anyways, here's the cards we made.


Good news... I have 5 kits available for purchase for $15 each, plus shipping.


(1 kit creates 5 cards, which includes everything pre-cut, 5 envelopes, and I will even pre-stamp and glitter the images for you.)


Because the Sparkle and Shine paper is double sided, you can customize how you want each card to look, whether you prefer the polka dot or the striped version.  


Mix it up however you want.  :)


Happy creating! :)


♥


Pocket Card Gift Card Holder


After I made my set of 3x3 cards last week, I kept on going and made this cute pocket card with a pull out tag for attaching a gift card onto.


My inspiration came from Kim O'Connell's card which I saw (and Pinned) on Pinterest.


Gosh, it's been a long time since I made a pocket card. 


I forgot how fun and easy they are.


The tag pulls out and you can easily attach a gift card with a glue dot or two.


Super cute.  :)


Happy creating!  :)


Supplies used (all CTMH unless otherwise noted):


Paper:  Sparkle and Shine B&T; Kraft, Cranberry CS


Stamps:  Holiday Tags, Stitch Wonder


Ink:  Chocolate


Embellishments:  Clear Sparkle, Sparkle Flourish, Dk. Chocolate Striped Grosgrain, Natural Hemp


Die/Punches:  Let It Snowflake Die-namics (MFT), 1/4" and 3/4" circle punches (EK), Corner Chomper (WRMK)


Other:  3D Foam Tape, ScorTape (ScorPal)


Washi Tape Ornament Holiday Card


So many fun uses for washi tape!


Here's just one example.


I used my Cricut and CTMH Artbooking cartridge to cut the ornament shape out of White Daisy cardstock.


Then took a scrap piece of cardstock and cut a circle a little larger than the ornament.


I covered the circle with strips of Sparkle and Shine Washi Tape, and adhered it to the back of the White Daisy piece, lining up the curve at the top to match the curve of the ornament when looking at it from the front side. 


Then I took a scrap piece of Ruby cardstock and adhered it on the back for the top part of the ornament.


I sewed the button and ribbon onto the front before adhering the front panel onto the card base.


The snowflake shape was also cut with the Cricut Artbooking cartridge, and then I covered it with Stardust Glitz Glitter Gel.  Before the gel dried, I set a Red Glitter Gem in the center of the snowflake.


Happy creating!  :)


Supplies used (all CTMH):


Paper:  Sparkle and Shine B&T; White Daisy, Ruby, Black CS


Stamp:  Holiday Tags


Ink:  Black


Embellishments:  Tulip Velvet ribbon - retired, Sparkle Button - retired, Red Glitter Gem, Sparkle and Shine Washi Tapes


Other:  Cricut Artbooking cartridge, Scallop border punch, Stardust Glitz Glitter Gel, Needle, White embroidery floss


Poster Tidings Joy Card


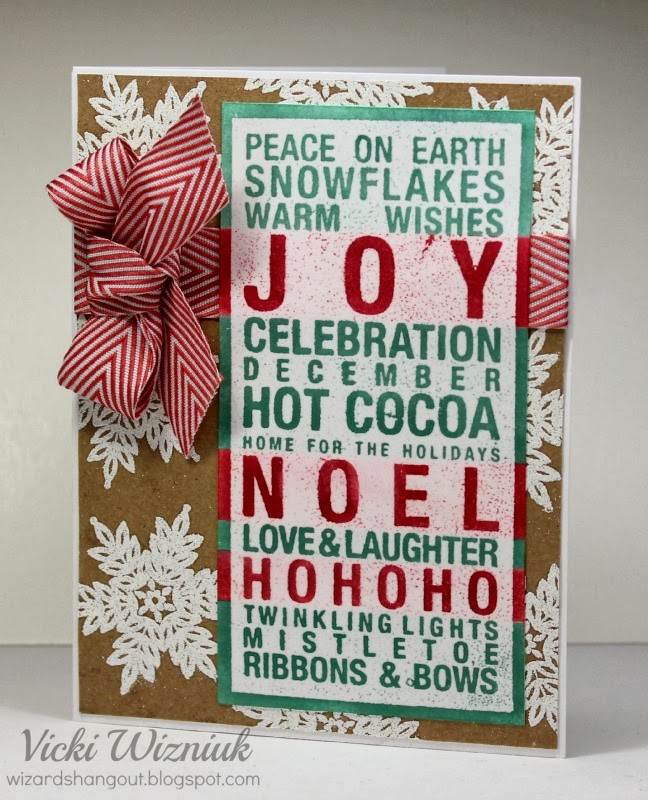
Here's another holiday card I made, this time using the Poster Tidings stamp set.


(Poster Tidings was the September SOTM set.)


To make my card, I stamped the image onto White Daisy cardstock using Versamark ink, then sprinkled Clear Detail embossing powder over top and heat set it.


Then I used 3x3 sticky notes to mask off the sections and applied Ruby and Juniper inks with my sponge daubers to add the colour.


Then I just trimmed it out, leaving a little border showing.


For the background piece, I randomly stamped the snowflakes from the Snowflakes stamp set and Versamark ink onto Kraft cardstock, sprinkled them with White embossing powder and heat set them.


Added a Cranberry Chevron ribbon and bow, and that was it.


Happy creating!  :)


Supplies used (all CTMH unless noted):


Paper:  White Daisy, Kraft CS


Stamps:  Poster Tidings - past Sept. SOTM, Snowflakes


Inks:  Versamark, Ruby, Juniper


Other:  White and Clear Detail embossing powders, Sponge Daubers, 3x3 post-it notes, ScorTape (ScorPal)


Give Thanks with Huntington


I love the Huntington papers.  ♥


 Look at how gorgeous they are on this card.


I made this card last month before Thanksgiving.


But I know that the US Thanksgiving is still coming up, so it's not too late to share, right?  ;)


The card design is from the Make It From Your Heart Vol. 1 book.


Happy creating!  :)


Supplies used (all CTMH):


Paper:  Huntington B&T; Colonial White, Barn Red, Olive CS


Stamp:  Happy Autumn


Ink:  Slate


Embellishments:  Huntington MyStickease, Antiqued Gold Durables Artisan Studs


Other:  Make It From Your Heart Vol. 1, 3D foam tape


Thanks for the Lift!


I took a break from making Christmas cards for a moment (or two) to play with a cute new stamp set from the CTMH Holidays from the Heart Gift Guide mini.  It is called Lifting Spirits and is orderable from this mini until December 31st.


This card has lots of different stuff going on.  So let's take a look at what I did.


I stamped the left side of my card base with Pear ink and a stamp from a past special stamp set called It's Your Day.


I used a spray pen and filled it with water and a couple drops of Lagoon re-inker, then lightly spritzed a 


3 1/4" x 5 1/2" piece of White Daisy cardstock.  To help dry it faster, I used my craft heater to basically blow it dry.


I stamped the hot air balloon and clouds with Slate ink onto the dried paper and set it aside.


Then I stamped the images with Slate ink onto a scrap piece of Colonial White cardstock, and colored them with my Prisma coloring pencils, using Gamsol (odorless paint thinner) and a craft nib to blend the colors.  After I was done coloring, I cut them out with my scissors.


To adhere the pieces, I used a piece of 3D foam tape on the back in the center, and used liquid glue for the edges.  So when they were adhered, they reminded me of puffy stickers from my childhood.


Gee, is that a new technique?  Odds are, likely not... lol


I tried to get a photo of them to show you, but I couldn't quite capture how it looks in person. 


It's pretty cool.


I simply adhered the sentiment banner with 3D foam tape, letting it "float".


Happy creating!  :)


Supplies used (all CTMH unless otherwise noted):


Paper:  White Daisy, Colonial White CS


Stamps:  Lifting Spirits, It's Your Day - past special


Inks:  Pear, Slate, Black, Lagoon


Other:  Spray pen, Lagoon re-inker, Coloring pencils (Prismacolor), Craft nib (Ranger), Micro-tip scissors, Odorless Paint Thinner (Mona Lisa), 3D foam tape


Happy Holidays Wreath


(Card inspired by this one by Leigh Penner)


I used 3 different stamp sets on this rustic card; Remarkable Wreath for the wreath, Holiday Tags for the sentiment, and A Holiday for the holly.


I also used some retired embossing powders on my wreath; Cranberry and Cocoa.


I found those to be more solid than using pigment ink onto the patterned paper.


But on the green bow, I used Topiary pigment ink stamped onto white cardstock, and fussy-cut it out with micro-tip scissors.


I also used Topiary and Cranberry pigment inks for the holly and berries.


Happy creating!  :)


Supplies used (all CTMH unless otherwise noted):


Paper:  Dakota B&T - retired; Colonial White, Cocoa, Cranberry CS


Stamps:  Remarkable Wreath, Holiday Tags, A Holiday


Inks:  Versamark, Cranberry Pigment, Topiary Pigment


Embellishment:  Red Sparkle


Other:  Double-ended Banner Die (PTI), Micro-tip scissors, Cranberry, White, and Cocoa Embossing Powders - retired, 3D Foam Tape, 1/4" circle punch (EK)


Sparkle and Shine Christmas Card Workshop


Upcoming Sparkle and Shine Christmas Card Workshop!


We will be using paper from the Sparkle and Shine papers, creating 5 Christmas cards.


In case it is hard to read on the photo collage above, here's the info:


When:  Saturday, November 16th


Time:  1:30 -3:30 pm


Where:  13413 Sunnyside Cove, Charlie Lake, BC


Cost:  $15


Space is limited.  Please contact me ASAP to reserve your spot.


I will be offering a limited number of kits, so if you can't make it to the class or if you are not local, please contact me to purchase.  Additional shipping costs apply.


~~~~~~~


*** If you are a fellow CTMH Consultant interested in using my Sparkle and Shine Christmas Cards Workshop for teaching your own classes, please contact me directly.


I have emailed every CTMH Consultant back who has contacted me.  But I've had a few emails bounce back to me, so if you have not yet received a reply, please add my email address into your email contact list, and then send me an email again.   Or you can check out my post on the CTMH Bulletin Boards under Artwork, and you will find a direct link there.


♥


Another Warm Winter Wishes Card


Here's another card using a different penguin image from the Wintry Wishes Hostess stamp set.


I stamped the penguin with Black ink, then coloured his earmuffs and stripes on his scarf with a Crystal Blue marker.


Then I added some Stardust Glitz Glitter Gel to the snowball and his earmuffs for a little sparkle.


Happy creating!  :)


Supplies used (all CTMH unless otherwise noted):


Paper:  Frosted B&Ts; Slate, Colonial White, Crystal Blue CS


Stamp:  Wintery Wishes Hostess stamp set


Ink:  Black, Champagne


Marker:  Crystal Blue


Embellishments:  Bling Button, White Embroidery Floss


Punches:  Pine Bough and Drippy Goo Border (MS)


Other:  3D foam tape, Stardust Glitz Glitter Gel, Sponge


Wintry Wishes Card Set


Here's a quick card set I made using a new Hostess set called Wintry Wishes, and paper from the Frosted Paper Packet.


I stamped the penguins in Black ink, then simply coloured their tuques, scarves and skates with markers to match the colour schemes I was going with for each card.


Then to add a little shine, I used a Silver Metallic Marker to add stripes and polka dots to their scarves and tuques.


I stamped a few snowflakes onto the Frosted patterned paper, then added Clear Sparkles to the centers.


The ribbon I used is the new Ruby Chevron ribbon.


And lastly, I added a little Stardust Glitz Glitter Gel onto the centers of the little snowflakes behind the penguins.


Happy creating!  :)


Supplies used (all CTMH):


Paper:  Frosted B&Ts; Colonial White, Slate, Topiary, Crystal Blue, Ruby CS


Stamp:  Wintry Wishes - Hostess Set


Ink:  Black


Markers:  Ruby, Topiary, Crystal Blue, Cotton Candy, Silver Metallic


Embellishments:  Ruby Chevron Ribbon, Clear Sparkles


Other:  Stardust Glitz Glitter Gel, 3D Foam Tape


'Tis The Season


Here's another Christmas card I made.


I used papers from the new Frosted paper packet.


I added some Slate and Twilight cardstock.


The tree is from the Always Grateful stamp set.


And the sentiment is from a older SOTM set called Year Round Cheer.


I added Prisma Glitter to the tree by simply dabbing dots of glue onto the tree branches using a glue pen.


Well, I'm off today for a girls' weekend with my friends.


We are flying to Victoria, BC, so one of the girls can run a marathon on Sunday.


So I will be away until holiday Monday, having some girly fun.


Happy creating!  :)


Supplies used (all CTMH):


Paper:  Frosted B&Ts; Twilight, Colonial White, Slate CS


Stamps:  Always Grateful, Year Round Cheer - retired


Inks:  Twilight, Black


Embellishments:  Aqua Dots


Other:  Glue Pen, Prisma Glitter


Dear Santa


When you don't have the right kind of patterned paper, stamp it!


I wanted to use a diagonal striped pattern on my card, but couldn't find anything in my stash suitable.


So I pulled out my In The Background stamp set, inked it up with Ruby ink, and stamped it onto a 5 1/4" x 4" piece of Colonial White cardstock.


The other stamps I used are from an older, retired set called Believe.


I coloured Santa and the present with my Ruby and Topiary markers.  I used Lt. Sorbet on his face, and Honey on his belt buckle.  And our old style Black marker for his mittens.


I also used Liquid Applique on his beard and mustache, and Stardust Glitz Glitter Gel on his trim of his suit and hat.


I cut the Topiary CS shape using the Cricut Artbooking Cartridge, lightly sanded the bottom near the dove tail, and then stamped the sentiment onto it.


Happy creating!  :)


Supplies used (all CTMH):


Paper:  Colonial White, Ruby, Topiary CS


Stamps:  In The Background, Believe - retired


Inks:  Black Pigment, Black


Markers:  Ruby, Honey, Sorbet, Black, Topiary


Embellishment:  Clear Sparkle


Other:  Stardust Glitz Glitter Gel, Liquid Applique, Cricut Artbooking Cartridge, Micro-tip Scissors, 3D Foam Tape


Holly Jolly Christmas Card


I've been in the mood lately to create Christmas cards.


Here's another one...


I used patterned paper from the Babycakes paper packet.


And the sentiment is from the Frosted Cardmaking Workshop kit.


Also, I used the Make It From Your Heart Vol. 2 book for the card design pattern.


Easy, pretty.


♥


Happy creating!  :)


Supplies used (all CTMH unless otherwise noted):


Paper:  Babycakes B&T; Ruby, Colonial White CS


Stamp:  Frosted Cardmaking WOTG set


Inks:  Black, Ruby, Slate


Embellishments:  Clear Sparkle, Black Striped Grosgrain


Other:  3D foam tape, Micro-tip Scissors, Make It From Your Heart Vol. 2, ScorTape (ScorPal)


Ho Ho Ho


I think it is time to share something.  Huh?


I love this Christmas card, so let's start here.


It uses one of those cute mini stamps that are only $2.95 each.


This one is called  Santa's Greeting.


I stamped and embossed the image, then coloured it in with my Ruby and Twilight markers.


The framed piece is a chipboard dimensional element that I simply sponged Ruby ink onto.


And I added a little sparkle with some chunky glitter to the scallop punched border strip.


Did you know that CTMH has a scallop border punch now?


Out of all of my punches, that one gets the most use.


Happy creating!  :)


Supplies used (all CTMH unless otherwise noted):


Paper:  Frosted B&T; Colonial White, Ruby CS


Stamp:  Santa's Greeting


Inks:  Black Pigment, Ruby


Markers:  Ruby, Twilight


Punch:  Scallop Border


Other:  DE Snapshots, Sponge, Clear Detail Embossing Powder, Glue Pen, Chunky Glitter (SU)


3 Babycakes Baby Layouts and Card... a Gift for a New Mom (of baby #2)


I created these layouts and card back in July or August.


I've been doing daycare for one little guy who is going to be becoming a big brother in October.


So I wanted to create a gift for his Mom for when the baby arrives.


Now, his Momma isn't a scrapbooker, so I wanted to create layouts that require minimal work on her end.


(I may have to trim some of her photos down to the correct size of the new baby for her layouts and glue them down for her.)


I also added some extra pages with slots for 4x6 and 6x4 photos at the back of her album, so she can easily add more photos to the album without having to do anything else.


The top two layouts were adapted from the Babycakes WOTG layout designs.


I just used the Babycakes My Compliments adhesive canvas pieces, and tweaked the originals a little.


The bottom layout is from the Make It From Your Heart Vol. 2 (if I remember correctly).


I saw this layout done by another fellow Consultant using these Babycake papers, and I thought I had written her name down.


But now it has been a few months, and I can't find who to give credit to.


If anyone knows, please let me know.


And lastly, here's the card I made, using some of the leftover pieces from the layouts.


I think it turned out pretty cute!


Although I had noticed that the framed portion is a little cock-eyed.


I've fixed that since I took this photo.  ;)


Until next time,


Happy creating!  :)


A Few Laughing Lola Cards


Love this card!


Inspiration was from this card by Lindsay Amrhein.


And this fun tall owl card was inspired by this card by Judith, shared on the Jane's Doodles blog.


And this is one of the cards created from the Laughing Lola Cardmaking WOTG Kit.


Love the fun patterns and colours in the Laughing Lola papers.


Happy creating!  :)


Good Times... for Today's Birthday Boy


Most boys nowadays are "gamers".


I know mine is.


I whipped up this quick card with papers from the Pro Player paper packet.


The game controller and little digital hand images are from the new Tech Speak stamp set.


And the other images are from one of the sets that comes with the Cricut Artbooking Collection.


The "torn page" is cut from the Artbooking cartridge, too.


Happy creating!  :)


~~~~~~~


On a side note, I want to thank you for liking my Facebook page.


I have well over the 30 needed likes now.  :)


Have a terrific day!


Supplies used (all CTMH):


Paper:  Pro Player B&Ts; White Daisy CS


Stamps:  Tech Speak, Cricut Artbooking Collection stamp set


Inks:  Black, Ruby, Whisper, Pacifica, Versamark


Embellishment:  Slate Washi Tape


Other:  Cricut Artbooking Cartridge, 3D Foam Tape, Micro-tip Scissors


Birthday Wishes with Huntington


I have been pretty busy over the past while creating tons of cards.  Just was having difficulty finding the time to photograph, edit, and post.   But I found time today to take pictures and edit all of them, so I will be sharing them with you throughout September and into October.


Here's one of those cards:


Don't you just love the beautiful Fall colours in these Huntington papers?


I sure do.


One of my closest friends is having a birthday tomorrow, but we will be celebrating tonight.


This card is for her. 


She was definitely born at the right time of year, because her fave colours are these ones.


When I was stamping the flower, it seemed a little plain to me, so I rubbed a little yellow onto it.  


Now I am not sure if I like the addition or not, but it is ok.


I guess if it bothers me too much, I still have time to change it out.  ;)


~~~~~~~


On a side note, I started up a Facebook page to share anything CTMH related.


Apparently I need to get 30 likes before it is visible through any searches.  ;)


Can you help a gal out?  Thanks so much. 


Here's the link: 


:)


Happy creating!  :)


Supplies use (all CTMH):


Paper:  Huntington B&Ts; Slate, Colonial White, Cashmere CS


Stamps:  Happy Autumn, Just a Number


Pigment Inks:  Black, Olive, Ponderosa Pine, Autumn Terracotta, Sunset, Creme Brulee


Embellishments:  Antique Gold Durables Artisan Studs


Other:  Make It From Your Heart Vol. 3, 3D foam tape, Micro-tip scissors, Clear Detail embossing powder


Frosted Cardmaking WOTG with a Twist


Hey all!


I want to share the new CTMH Frosted Workshop on the Go Kit with you.  Perfect for creating this year's annual Christmas cards.  


The instruction guide included with the kit shows you how to create 15 cards (5 each of three different designs).  And there is enough left over that you could create more cards or even a layout.


Here is what the completed cards in the kit look like.


I personally wanted to try something a little different with the kit, so I changed out my reds, greens, and browns, for blues and greys.


I really like how they turned out.


I will be offering this as a workshop in my studio in October, and give you the option to create the original version of the kit, or with just a few changes, you can do it in the blues/greys.


Happy creating!  :)


Supplies (all CTMH):


Paper:  Frosted Cardmaking WOTG Kit, Twilight CS, Slate CS, Whisper CS


Inks: Slate, Twilight


Other:  3D Foam Tape, Micro-tip Scissors